This document was written in order to unify the internal company Git Flow rules. This method is not introducing pure Git Flow, as it is a mix of both Git Flow and GitLab Flow, with best company practices worked over many years. It helps keep a clean and readable history of the repository and better control over changes and project lifecycles.
This document was written in order to unify the internal company GitFlow rules. This method is not introducing pure GitFlow, as it is a mix of both GitFlow and GitLab Flow, with best company practices worked over many years. It helps to keep a clean and readable history of the repository and better control over changes and project lifecycles.
Initializing repository
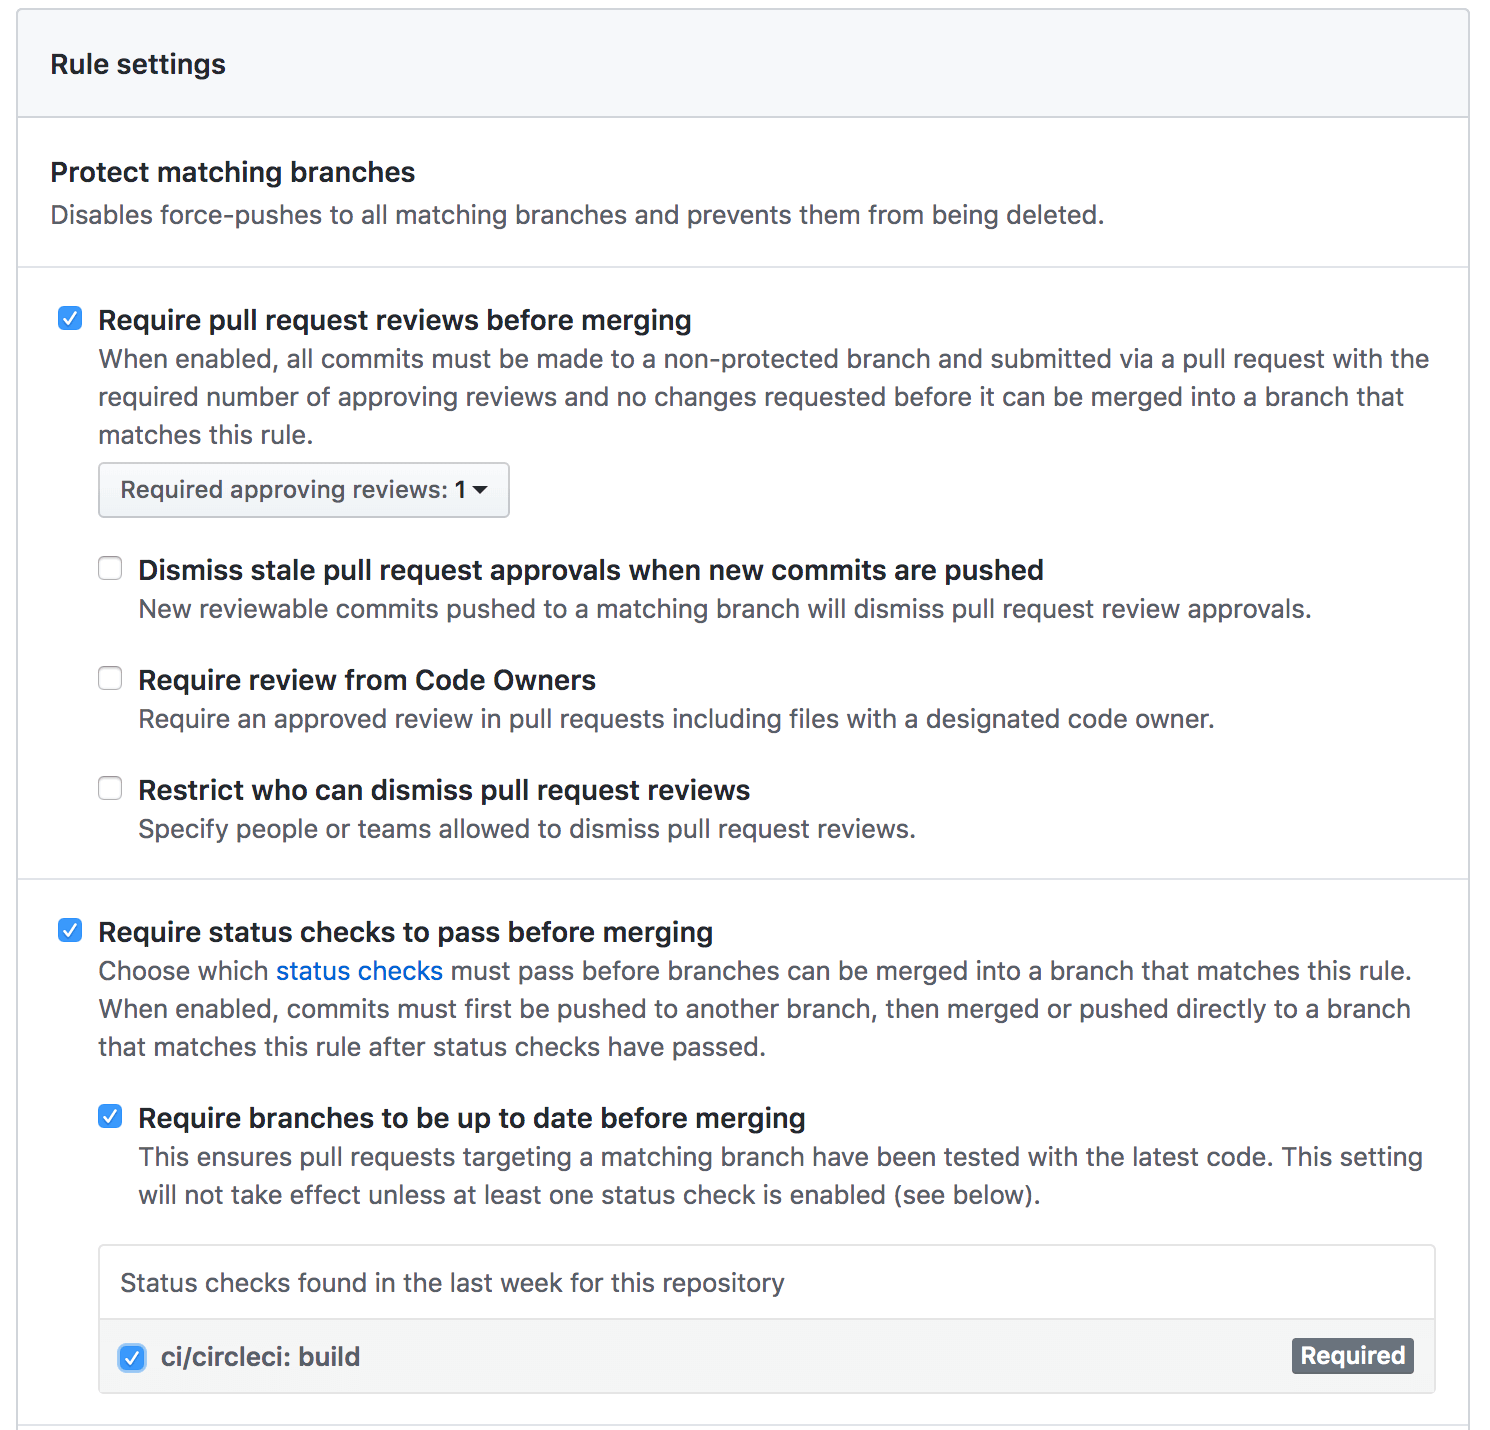
After initializing the repository, create a develop and master branch if it wasn’t included by default. The develop branch should contain a development code that is a mirror of the master branch with new features included. The master contains a stable version of code, representing the production state. Both have infinite lifetimes, and in comparison to other branches in Git Flow, will never be removed. Set up proper protection rules: require to pull request reviews before merging and require status checks to pass before merging. You may also consider allowing only chosen team members to merge changes to the master.
NOTE: Sometimes it is important for the project to add more infinite branches, for example, to represent available environments. However, keep the “rule of two” if possible.
Feature branches
When starting to work with a given feature, first ensure you have your develop branch synced.
$ git checkout develop && git pull --rebase
Then, checkout to your feature branch. Name it respectively to the given schema: feature-JIRA-TASK-ID or you can also break that rule and name it differently. In this case, ensure that it does not conflict with patterns reserved for release, hotfix, bugfix, development or the master branch. Keeping JIRA task IDs will help you manage your feature branches more effectively.
$ git checkout -b feature-JIRA-TASK-ID develop
This branch should exist as long as the given feature is developed and then merged to the parent branch. To commit to your local branch, please follow this command:
It is recommended that you add more commits to your local branch, following the “Commit early and often” rule. However, in the end, they must be squashed into a single commit representing a JIRA Task. Often committing will help you to manage your development history. When the feature is ready, it is time to open a Pull Request to develop a branch. First, you may push your local branch if it wasn’t pushed too far:
Before opening a pull request, please ensure the following:
a proper description has been given – usually, you would link your JIRA task, but you may also include some useful information related to the current code
CircleCI steps were passed successfully
your team members were assigned – it is good practice to include all your team members as assignees
the reviewers were selected – the number of reviewers depends on your team
your code is actually ready for review – take a last look at your code, think again if there is anything left to refactor, test it locally and ensure that it is ready for further steps.
there are no merge conflicts and a branch is up-to-date with develop – if there are any, resolve them first
$ git checkout develop && git pull --rebase
$ git checkout feature-JIRA-TASK-ID && git rebase develop # use -i flag for squash
$ git push -f origin feature-JIRA-TASK-ID #use this carefully as -f flag overwrites remote repository
keep only important commits – each commit should be represented by JIRA task, for example, JIRA-TASK-ID: New feature configuration; others should be squashed while rebasing your branch with the develop branch
you have the proper destination branch selected
you don’t forget to change the status of your JIRA task
Merging feature branch
It is time to merge your changes to develop branch when:
the pull request was approved by selected team members
all tests finished successfully
there are no merge conflicts and the commit history looks fine
This can be done by either the project manager or feature developer. In order to perform the merge, follow these steps:
Release branches should be created by a person responsible for the current release. Usually, releases are created periodically, for example, according to the sprint lifecycle.
Semantic versioning
Giving a release branch a proper name and corresponding tag is not an easy task at the very beginning. It is good practice to start using semantic versioning (https://semver.org/) which allows better control and makes reading the git history easier. The version string is constructed according to MAJOR.MINOR.PATCH schema:
MAJOR – change representing incompatible API changes
MINOR – adding new features in a backwards-compatible manner
PATCH – adding backwards-compatible bug fixes
You may also use special suffixes, such as those representing beta or legacy branches, or create pre-releases. In that case, name it properly, e.g. 1.1.0-beta.4, 1.1.0-beta.5 or 1.1.0-alpha.
Making a release
The release branch should be a child of develop and could contain only commits connected with bugfixes.
The branch name should be based on the release version, with the release- prefix: release-MAJOR.MINOR.PATCH. The release branch should be fully tested both automatically and manually on the staging environment. If bugs occur, this is the last opportunity to push proper fixes and re-run the whole process, as long as it won’t be positively checked and ready for further processing. Then, the release commit should be pushed, with changes of the current release version string in files, such as package.json. It should also have an impact on the CHANGELOG.md file. This will help you track all changes before a proper release and prepare the content for GitHub release when the merge process is completed. The single file update should consist of all release changes grouped into three categories: features, fixes and maintenance.
In the first step however, make sure you have both of your develop and master branches up-to-date.
At this point, one may decide to create another pull request to the master with the release branch. It may be a good idea to run an additional check if all tests pass well on the remote machine.
 $ git checkout master
 $ git merge release-M.M.P
 $ git tag -a M.M.P # addition message may be set via -m flag
 $ git push origin M.M.P
 $ git push origin master
 $ git branch -d release-M.M.P
 $ git push origin :release-M.M.P
Then go to the GitHub releases page and press the “Draft new release” button. In the displayed form, select the current version tag, set the release title similar to the release commit (Product Name M.M.P release) and a proper description, based on the CHANGELOG.md file. For public projects, the description should contain a list of all PR included in the current release.
In case some bugfixes were applied on the release branch, ensure you have your develop branch updated:
The main difference between a bug and hot fixes is their target branches.
Bugfix
Bug fixes should patch release branches as the only form of updating code before merging it to master. First, create the branch from the current feature branch. Make sure you have it up-to-date locally.
Then commit the necessary changes. After the process is finished, create a pull request and target it to the release branch. Follow guidance from the feature branch section. Your final commit title should match the given schema: “Bugfix M.M.P: Problem essence fix”. When the pull request is approved, it is time to merge it to the current release.
In order to perform a hotfix on the master branch, very similar steps to a bugfix must be taken, keeping in mind that the target branch is now the master branch.
Then, follow the usual development steps and when the process is finished, create a pull request with the master branch as a target. Keep in mind that the final commit should match the given schema “Hotfix X.Y.(Z + 1): Problem essence fix”. When every checkpoint has passed successfully, perform a merge to master. These steps differ from the one presented for a bugfix, as we need to bump the current release version.
$ git checkout master && git pull --rebase
$ git merge hotfix-X.Y.(Z+1)
$ git tag -a X.Y.(Z+1) # addition message may be set via -m flag
$ git push origin X.Y.(Z+1)
$ git push origin master
$ git branch -d hotfix-X.Y.(Z+1)
$ git push origin :hotfix-X.Y.(Z+1)
$ git checkout develop && git merge master
$ git push origin develop
$ git checkout master # branch should be synced with master branch at this stage
$ git merge release-M.M.P
$ git tag -a M.M.P # addition message may be set via -m flag
$ git push origin M.M.P
$ git push origin master
$ git branch -d release-M.M.P
$ git push origin :release-M.M.P