Create Google Chrome Extensions with Netflix subtitles styler
Lukasz Kolko
Today we will create Google Chrome extensions for manipulating Netflix subtitle styles in real time. You will find information about creating extensions from scratch, some practical advice and general views on extension architecture. If you are not happy with the available Netflix subtitles options or just want to quickly create some extension to make life easier, this article is for you.
Our goals:
create extension logic
store settings in the browser Local Storage
autoload and activate extensions only on the Netflix page
Netflix by its API sends every subtitle sentence separately. It uses CSS styles for styling subtitles. With access to the page DOM we can manipulate those received styles with Chrome extension.
The manifest
Firstly, we have to create the manifest file called manifest.json. This tells the browser about the extension setup, such as the UI files, background scripts and the capabilities the extension might have.
As you see, we have some standard information, such as name, version, description, homepageurl and manifestversion.
One of the important parts of the manifest is the permissions section. This is an array with elements that our extension can access.
In our case, we need to have access to tabs to find the active tab, execute scripts and send messages between the UI and the extension. We need storage for store extension settings in the browser and declarativeContent for taking action depending on the tab content. The last element https://*.netflix.com/ allows extension access only to the netflix.com domain.
Chrome extensions have a separate logic from the UI so we need to have background.scripts, which tells the extension where it can find its logic. persistent: false means that this script will be used only if needed. page_action is the section with the UI part. We have here a simple HTML file for a popup menu and an extension’s PNG logo.
Extension logic
First we have to setup runtime.onInstalled behaviours, remove any current rules (for example from older versions) and declare function to add new rules. We use Local Storage for the storage settings so we can allocate default settings after the extension is installed.
Our rule goal is to disable the extension button on all domains other than netflix.com. We create new rule with PageStateMatcher conditions and declare ShowPageAction where new rule will be assigned.
Firstly we check that changeInfo.status has the status complete. This means that the website on this tab is loaded. Then we get settings from Local Storage and declare which script should be run on the current tab with tabId. Finally, in callback we send the message with settings from the UI to the script.
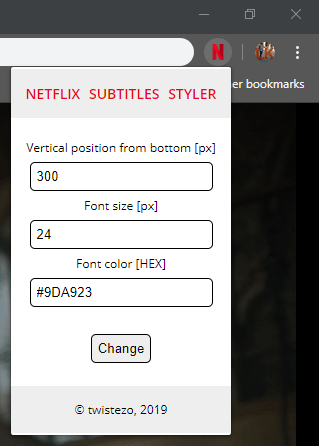
Extension UI
To create an extension popup menu with form, we create three files: popup.html and popup.css with visual layers and popup.js with logic for communicating between the menu and isolated background.js script.
Our UI goal:
Here we have a simple HTML form with built-in validation: popup.html:
In above script, we load settings from Local Storage and attach them to form inputs. Then we create listener to submit event with functions for the save settings to Local Storage and send them by message to our script. As you see, we use Local Storage in every component. The Chrome extension doesn’t have its own data space so the simplest solution is to use browser local space like Local Storage. We also often use the sendMessage function. It’s caused by Chromme extensions’ architecture – they have separate logic from the UI.
The script
Now it is time to create script.js with logic for manipulating Netflix subtitles styles.
First, we create onMessage listener for receiving messages with settings from the extension.
 chrome.runtime.onMessage.addListener((message, _sender, _sendResponse) => {
   // function for manipulating styles
 });
Then in the same file we create the function for changing proper Netflix styles to our styles in real time.
For Netflix, every time it receives whole subtitle sentences it swaps only the subtitles part of the page DOM. So we have to use an observer function like MutationObserver, which will be triggering our changeSubtitlesStyle function every time when the page DOM has changed. In the callback function we see simple manipulation of styles. The commented lines have information about where you can find proper styles.
Time to run
I assume that you do not have a developer account in Chrome Webstore. So to run this extension go to chrome://extensions/ in your Chrome, click the Load unpacked, select folder with the extension and that’s it! Then, obviously go to the Netflix page for testing it.
Conclusions
As you see, it is easy to start creating some extensions that make life easier. The most important part is to understand Google Chrome Extension divided architecture and communication between components. This subtitles styler is only a simple demo of what you can do with the Chrome Extension API.
As you see, it is easy to start creating some extensions that make life easier. The most important part is to understand the Google Chrome Extension divided architecture and communication between components. This subtitles styler is only a simple demo of what you can do with the Chrome Extension API.
Imagine enhancing your viewing experience on platforms like Netflix with the power of extensions. For instance, the popular Netflix Party allows users to watch content together in sync. An extension icon in your toolbar can provide you quick access to control features when streaming Netflix. The idea behind tools like Netflix Extended is to add more functionality directly into the Netflix app through the Netflix extension integrated within Chrome. When browsing the Netflix website, such extensions can assist users in navigating through Netflix categories more efficiently or even discovering hidden Netflix content that they might not come across otherwise.
Furthermore, imagine being able to add a custom profile picture to your Netflix profile or having more control over the subtitles and playback speed. All of this can be accessible directly from the Chrome web browser, making the overall Netflix experience more tailored to each user’s preferences. Extensions not only enhance the functionalities of websites like Netflix but also elevate the overall user interaction, making it more immersive and user-friendly.