It’s time to discuss the second point (Terminal) from the entry How to start programming in Ruby in 7 steps. Without further ado, I invite you to read the content and follow up with some practical exercises that I have prepared for you. Let’s go!
Terminal – theory
The terminal is a basic tool in any operating system, also called a console or a command line. Every time you hear one of these terms, you’ll know it’s about that. It allows for the communication with the system shell, for example, with bass (the default shell for Ubuntu). The shell acts as an intermediary between the operating system or applications and the user. To put it simply, the console enables you to give commands to the system. It doesn’t matter in which language you program – the sooner you master this tool, the better. The terminal will be used to install/run programs on your machine, manage computer resources, navigate through directories, create files or run previously prepared scripts. These skills are necessary when managing a server that does not have a graphical user interface (GUI).
The keyboard shortcut that opens the terminal is ctrl + alt + t
A lot of people try to postpone learning the command line, looking for versions of programs with a nice graphical interface. However, if you want to start the adventure with programming, the terminal will be an indispensable element of learning, so it’s time to become friends. The beginnings can be hard, but don’t worry.
Terminal – Practice
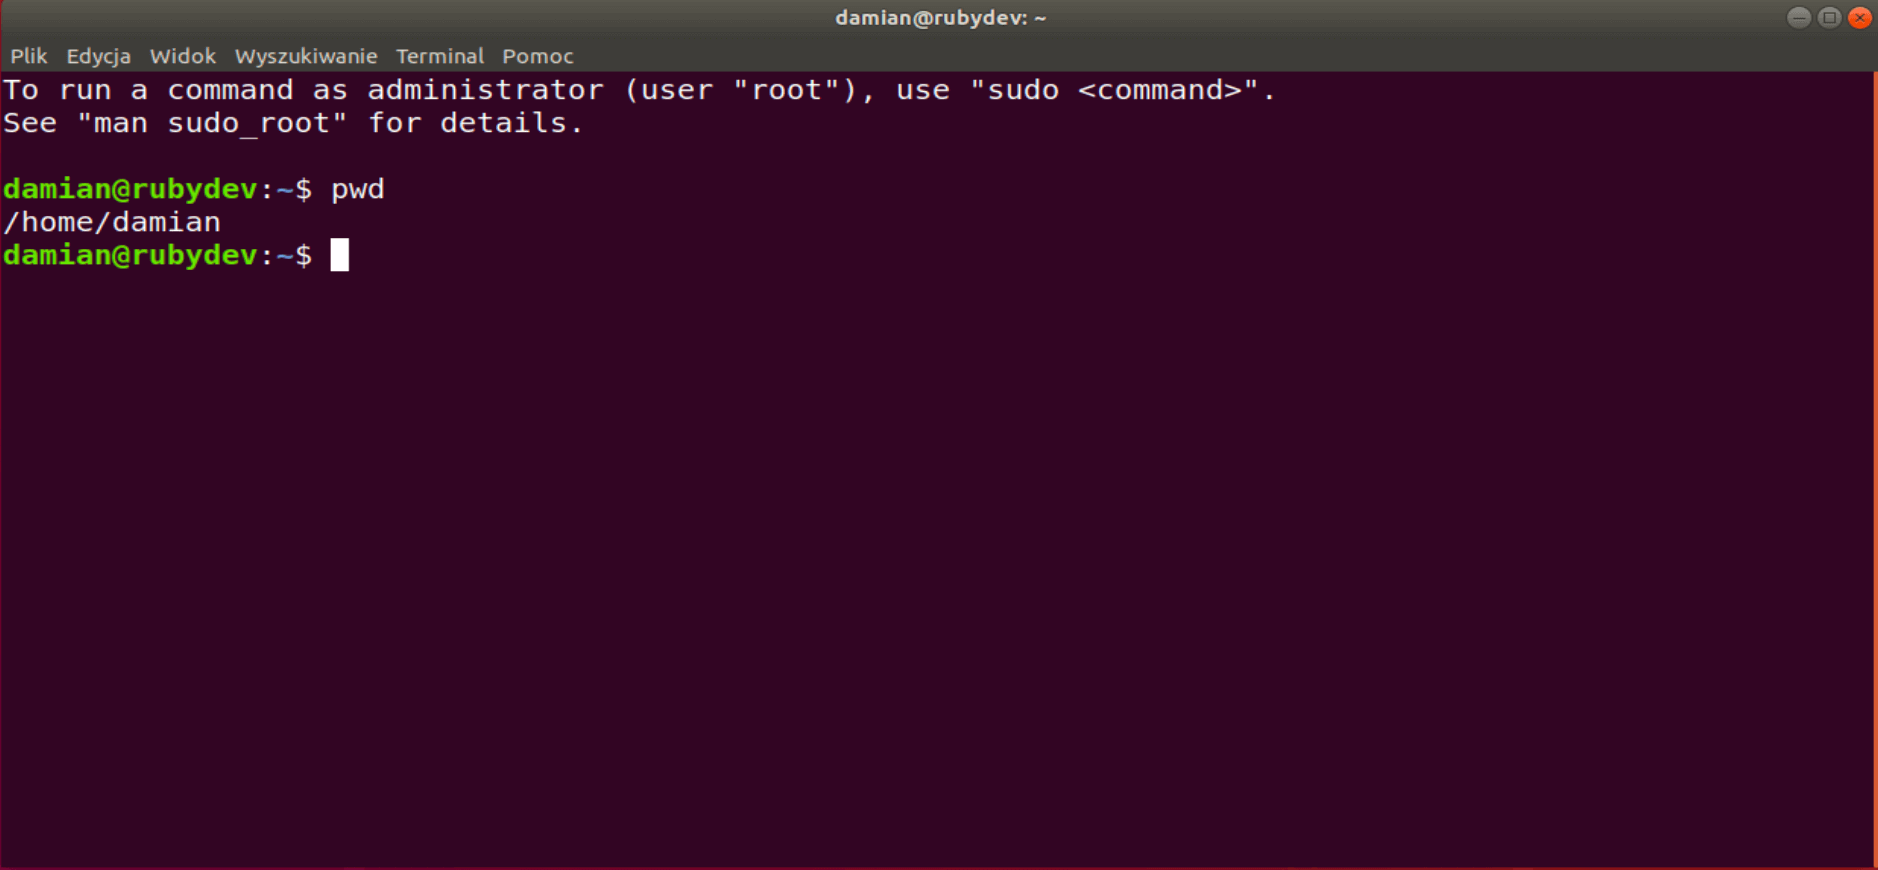
In the picture above, we have an already open Ubuntu terminal where you can see:
damian@rubydev:~$
The first part, before the colon, is nothing but the username we chose when installing Ubuntu and the name of our computer. However, the tilde ~ means the home directory. The last character $ is the so-called “prompt.” After that commands can be entered.
Where am I?
pwd (Print Working Directory) – it always returns the path to the place where you are at the moment. When you get lost, you can always use the pwd command.
At this point, it is worth noting that immediately after starting the console you are always in your home directory, i.e. / home / USER_NAME, where USER_NAME means your username.
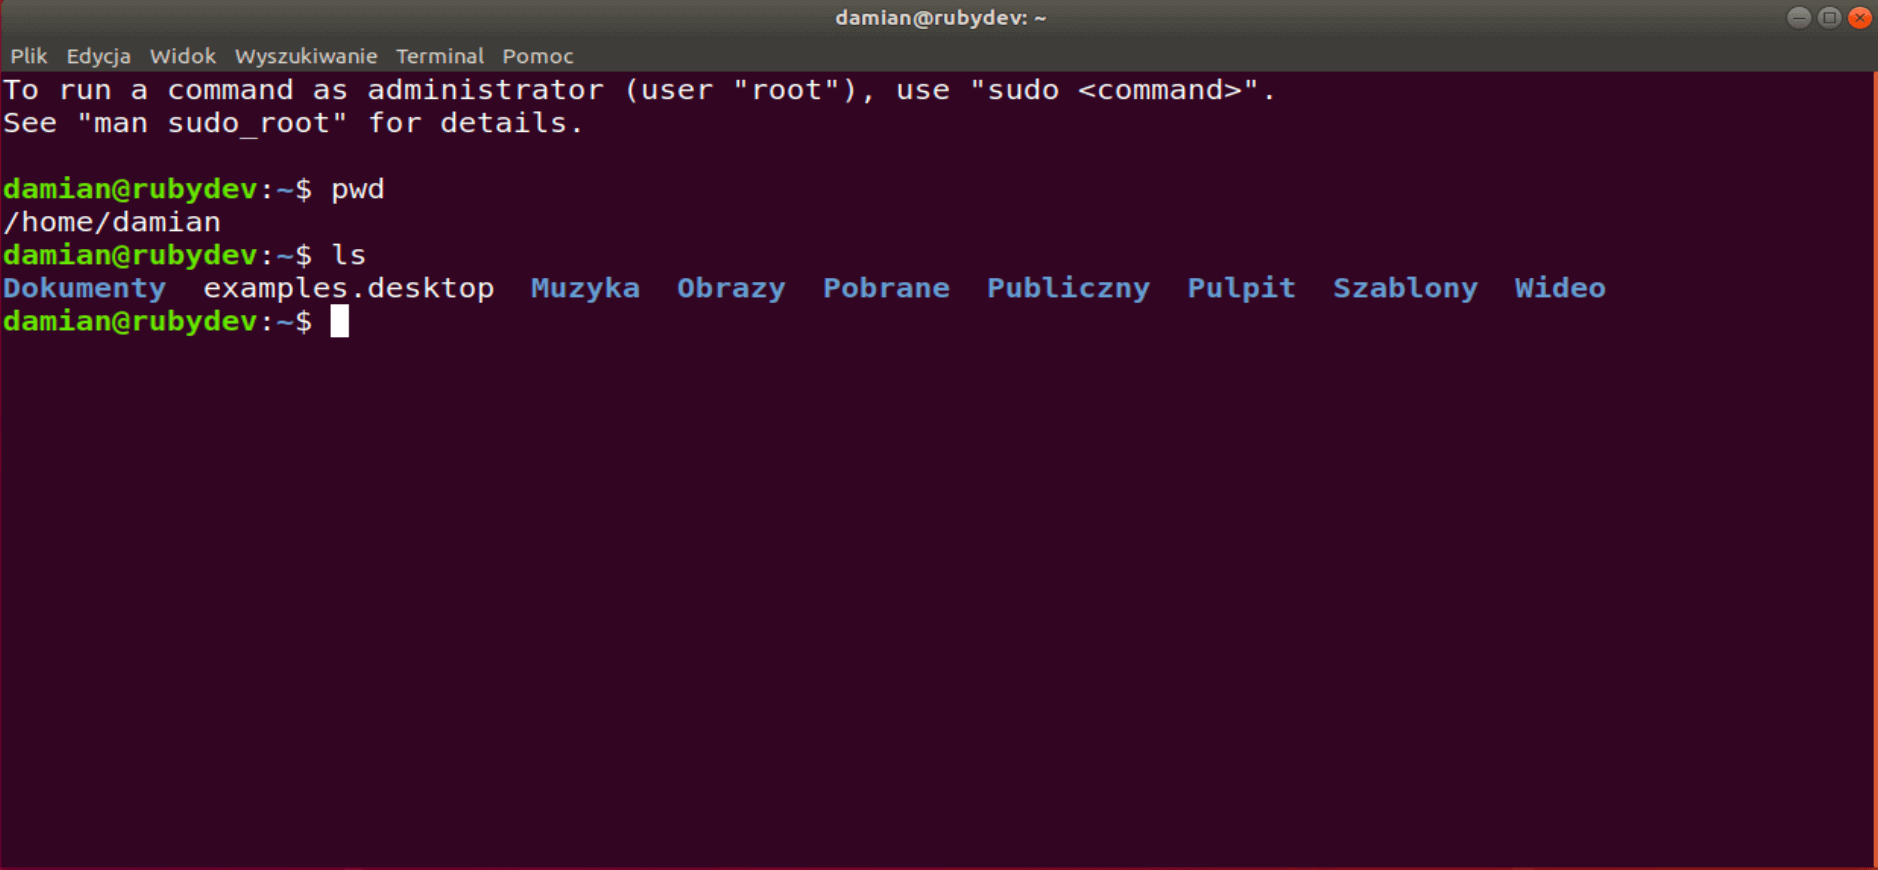
Show me what you’ve got!
ls (List) – it is one of the most commonly used commands to display the contents of the directory in which you are currently.
Commands can also take arguments (options) that will modify the behavior of your commands in some way. You can write them together or separately, e.g.:
damian@rubydev:~$ ls -la
or:
damian@rubydev:~$ ls -l -a
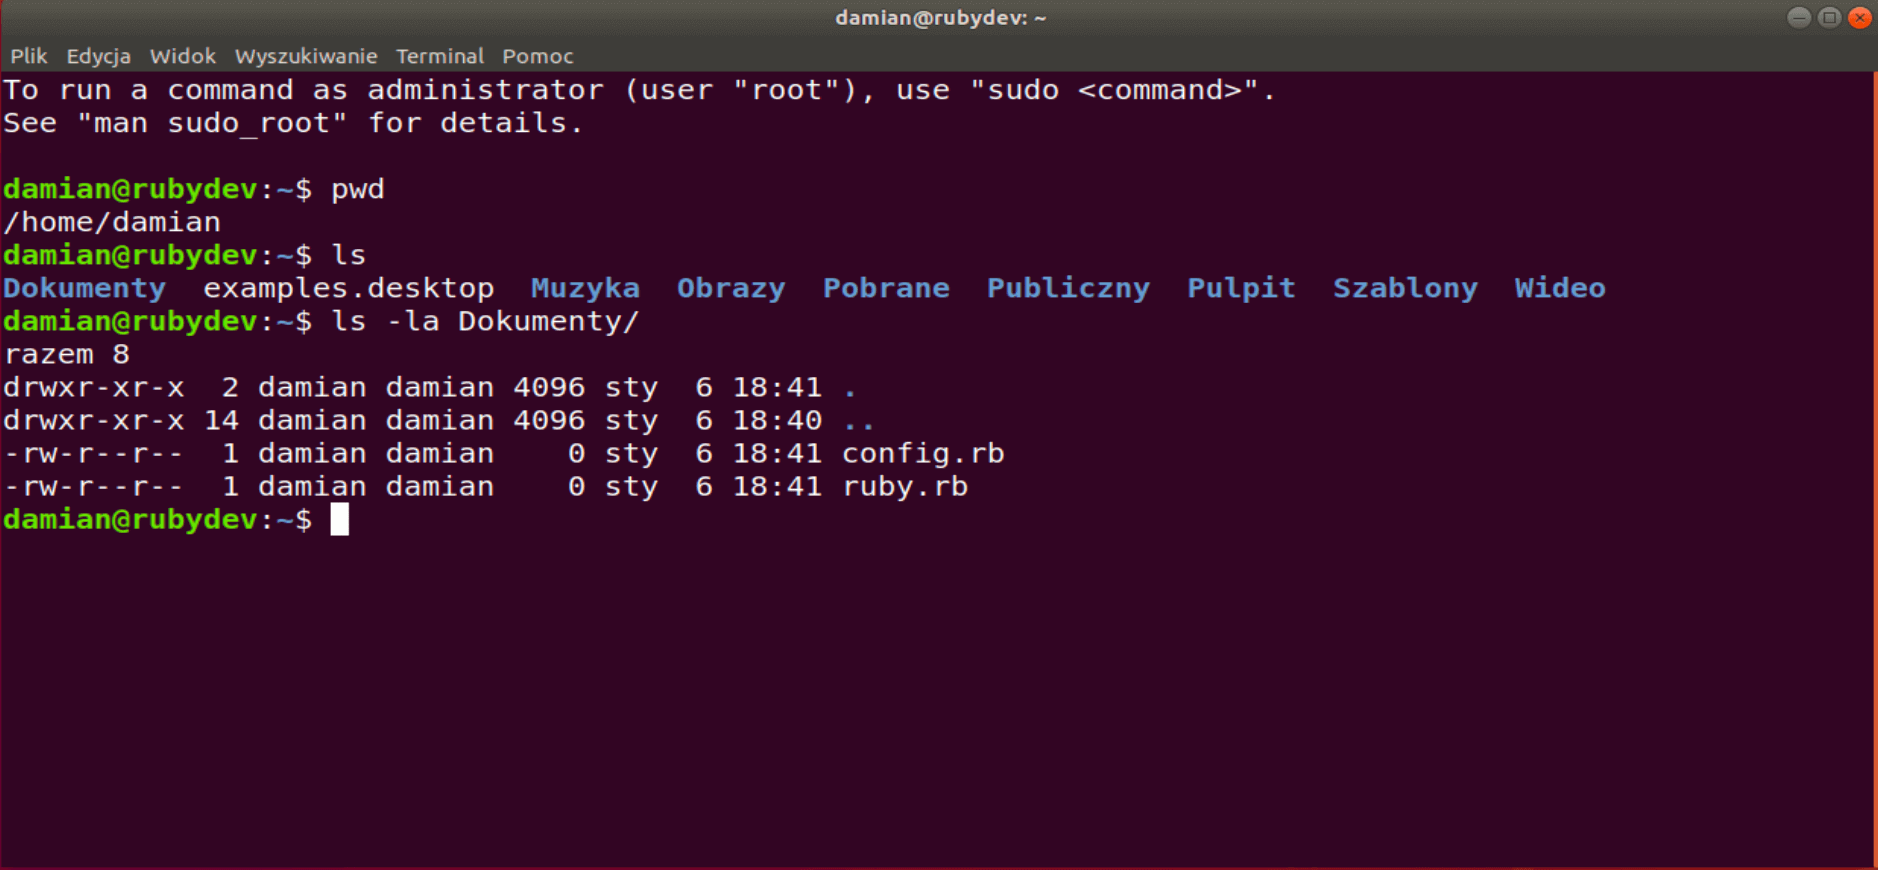
-l is an option that prints files and directories in the form of a list with detailed information, while -a or --all also prints hidden files (that is, files with names beginning with a dot).
The options passed are usually preceded by - or --. Another useful trick is to enter the path to the directory the contents of which you want to check right after ls or after the options passed (if you use them). In this way, you will do it without changing your current location.
In this case, we learned what files we have in the Documents directory without moving from the home directory.
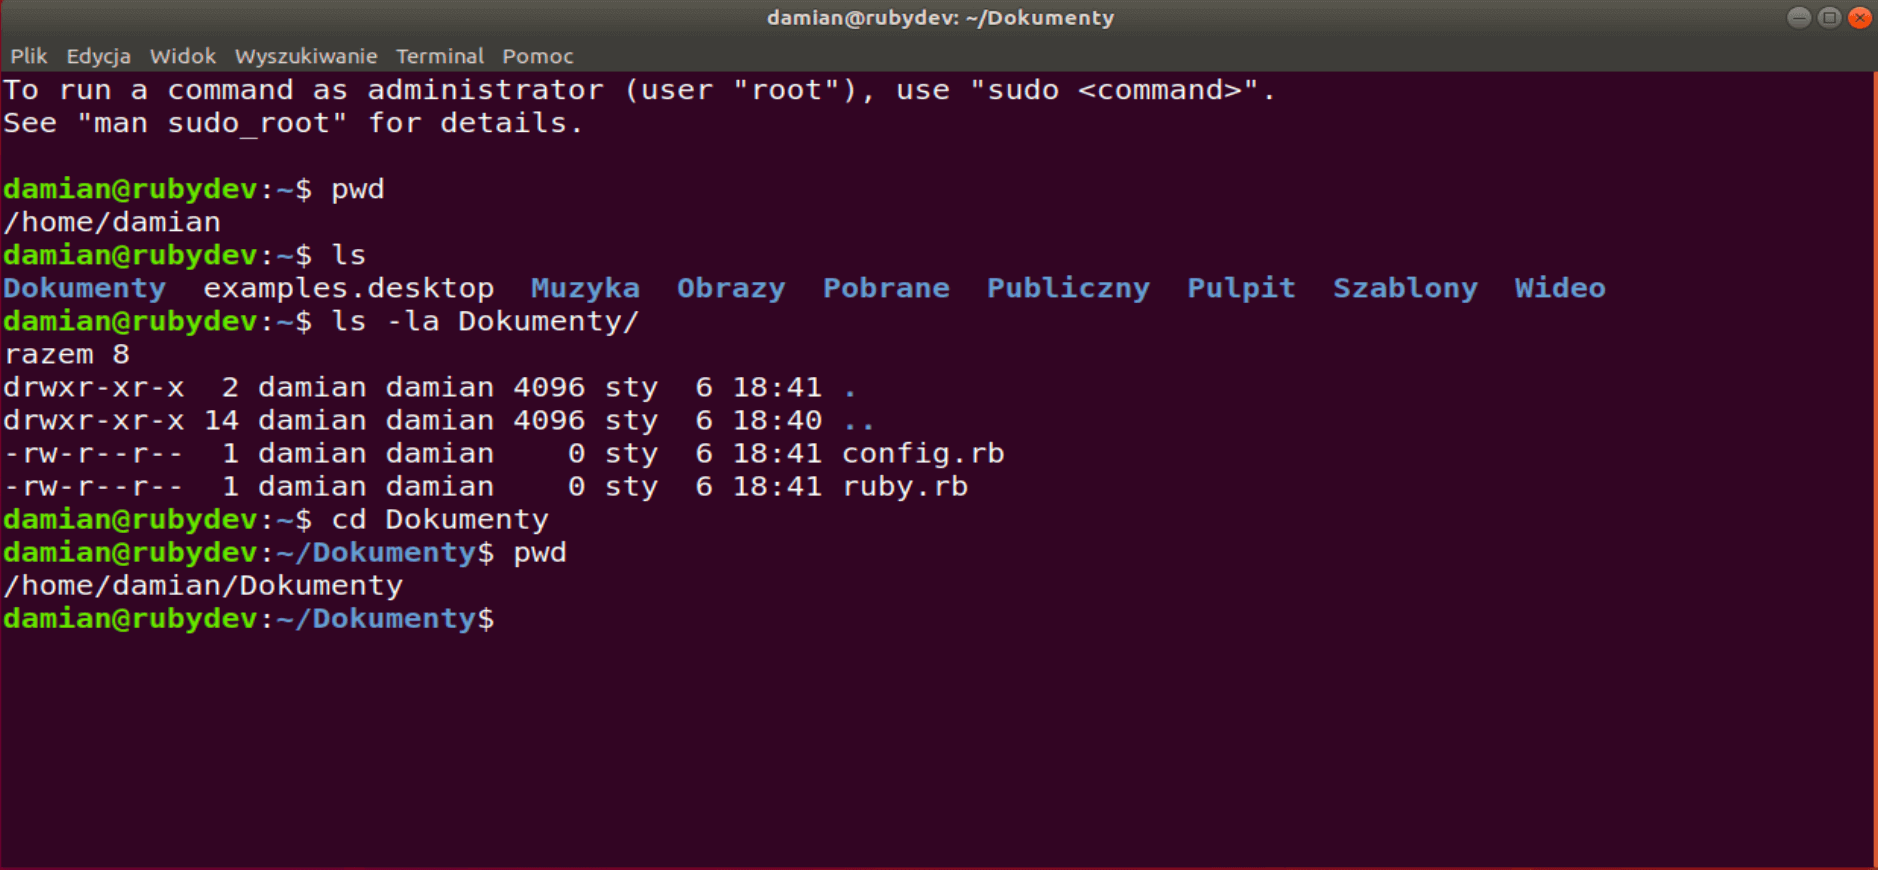
Let’s get on the way!
Time to explore your system a bit and learn how to navigate it. We will use the cd (change directory) command to move.
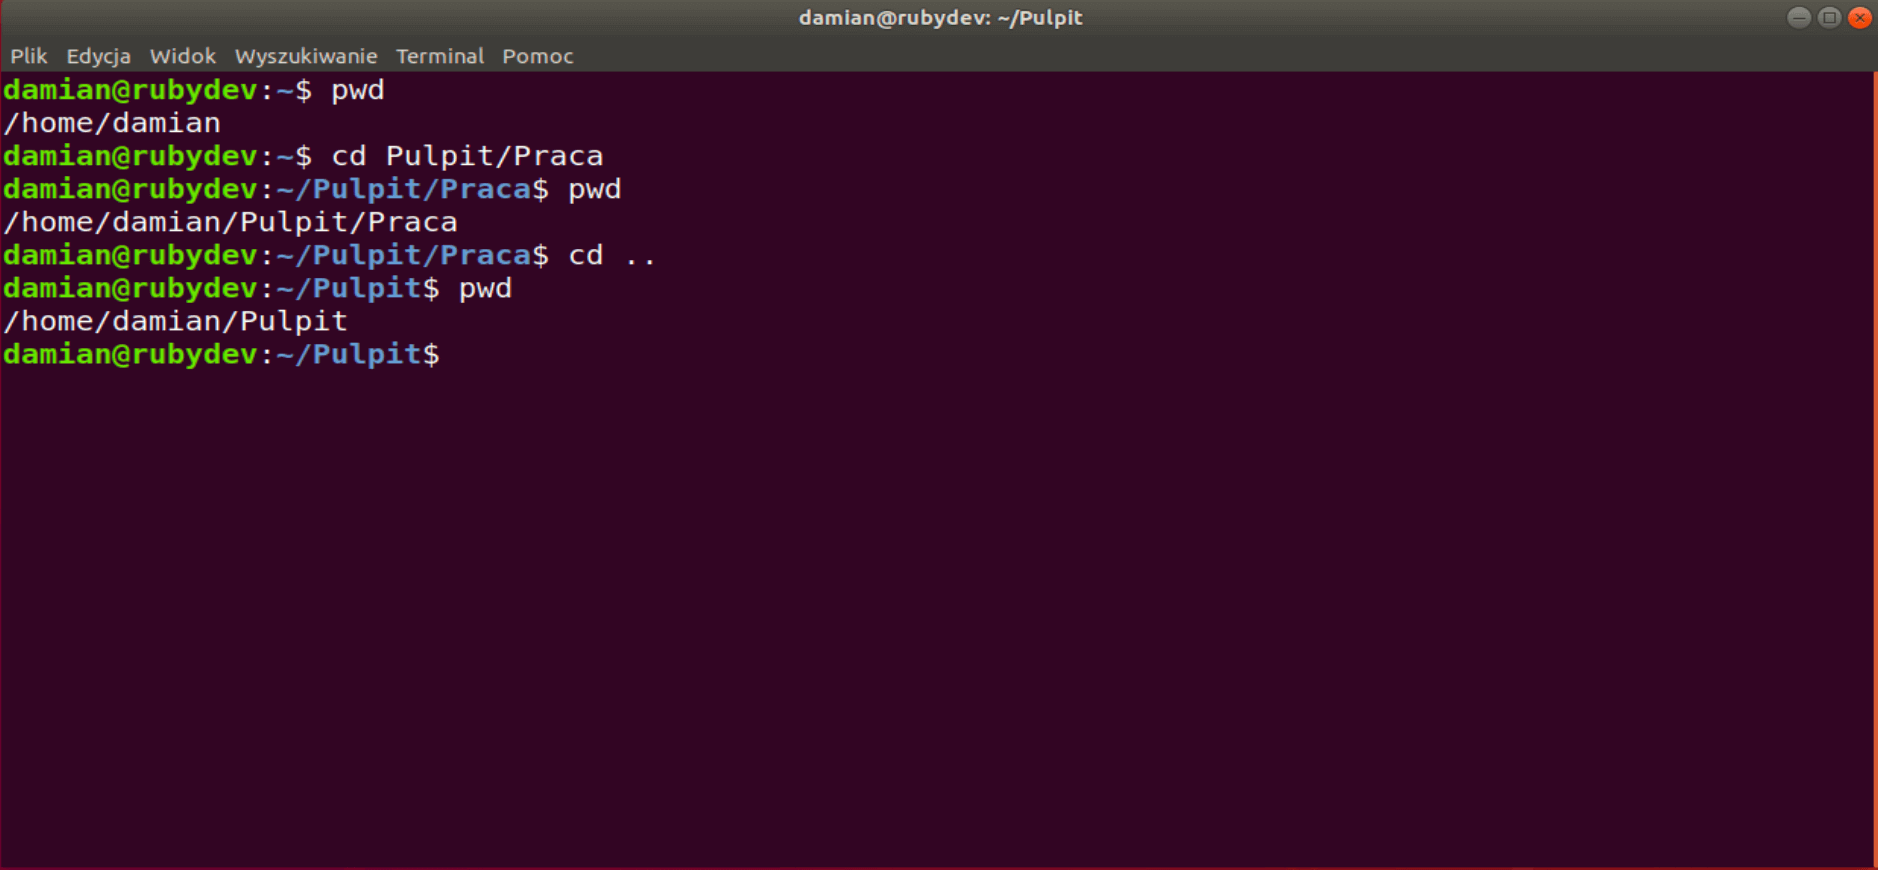
If you want to go to the Documents directory from your home directory, the command will look like this: cd Documents. To make sure you’re in the right place, you can check it with the already known pwd command:
If you want to go back, you can use cd .., but remember that .. will take you back to the parent directory, not to the place from which you entered the command. Maybe this screen will illustrate this issue better:
It is also worth knowing some shortcuts that will help you work more efficiently. The cd or cd ~ itself will take you straight to the home directory, from anywhere in your system.
damian@rubydev:~/Pulpit/Praca$ cd
damian@rubydev:~$ pwd
Choose the / if you need to get to the root directory, the so-called ‘root.” It is the basic directory of the system, containing the directories with configuration files, installed applications and user directories (including your home directory).
 damian@rubydev:~$ cd /
 damian@rubydev:/$ pwd
 /
Another thing that will facilitate your work is using the TAB button. You don’t have to enter the full name of the directory you want to go to every time, or even remember its full name. By entering the first letter of the catalog and pressing TAB, the terminal will suggest the available options or complete the command immediately if there is only one possibility. Let’s try it out:
damian@rubydev:/$ cd P[tab]
 Pobrane/ Publiczny/ Pulpit/
 damian@rubydev:/$ cd P
 damian@rubydev:~$ cd D[tab]
 damian@rubydev:/$ cd Dokumenty/
We will use the tabulator quite often in this training session.
Help?
Did you forget what options the <codecd works? You can use the documentation support that your system offers. The man (manual) command is used for this:
damian@rubydev:/$ man cd
This is not the only way. You can also use the --help or -h option, which will show you a quick help guide, for example:
damian@rubydev:~$ ls --help
Tasks:
1. Find out what other options besides -l -a the ls command can accept, and what details the -l option returns exactly.
2. Since you can navigate through the directories, familiarize yourself with the file structure of your system.
Time to add and change something!
To create new directories in which you will keep your projects, use the mkdir (make directory) command followed by the name of your choice.
 damian@rubydev:~/Pulpit$ mkdir Projekty
 damian@rubydev:~/Pulpit$ ls
 Praca Projekty
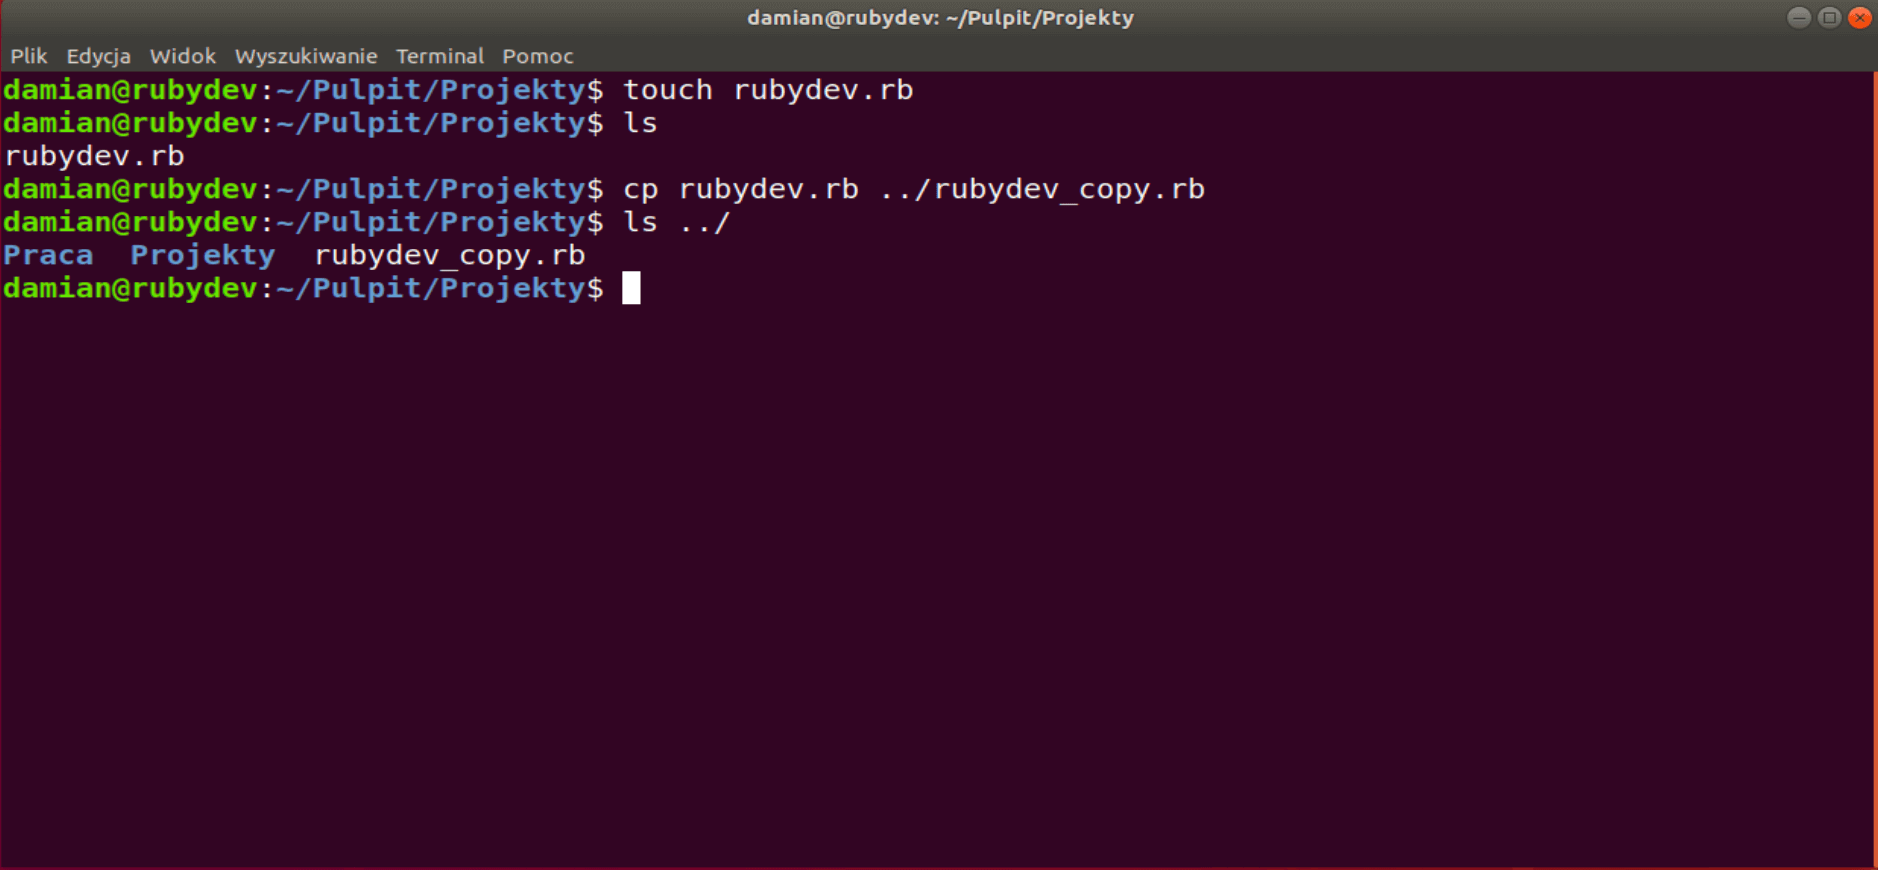
If you want to create a file, you can use the touch command:
 damian@rubydev:~/Pulpit/Projekty$ touch rubydev.rb
 damian@rubydev:~/Pulpit/Projekty$ ls
 rubydev.rb
Since you can add new directories and files, you can also copy them! To copy the files, you will use the cp (copy) command, and to copy directories cp add the -r (recursive) option. In copying a file / directory, the command takes two parameters:
the file you want to copy, e.g. the previously created rubydev.rb file,
the place to which you copy (you can give the copy a new name by inserting it at the end of the destination path).
I copied the rubydev.rb file to the parent directory, i.e. the Desktop directory
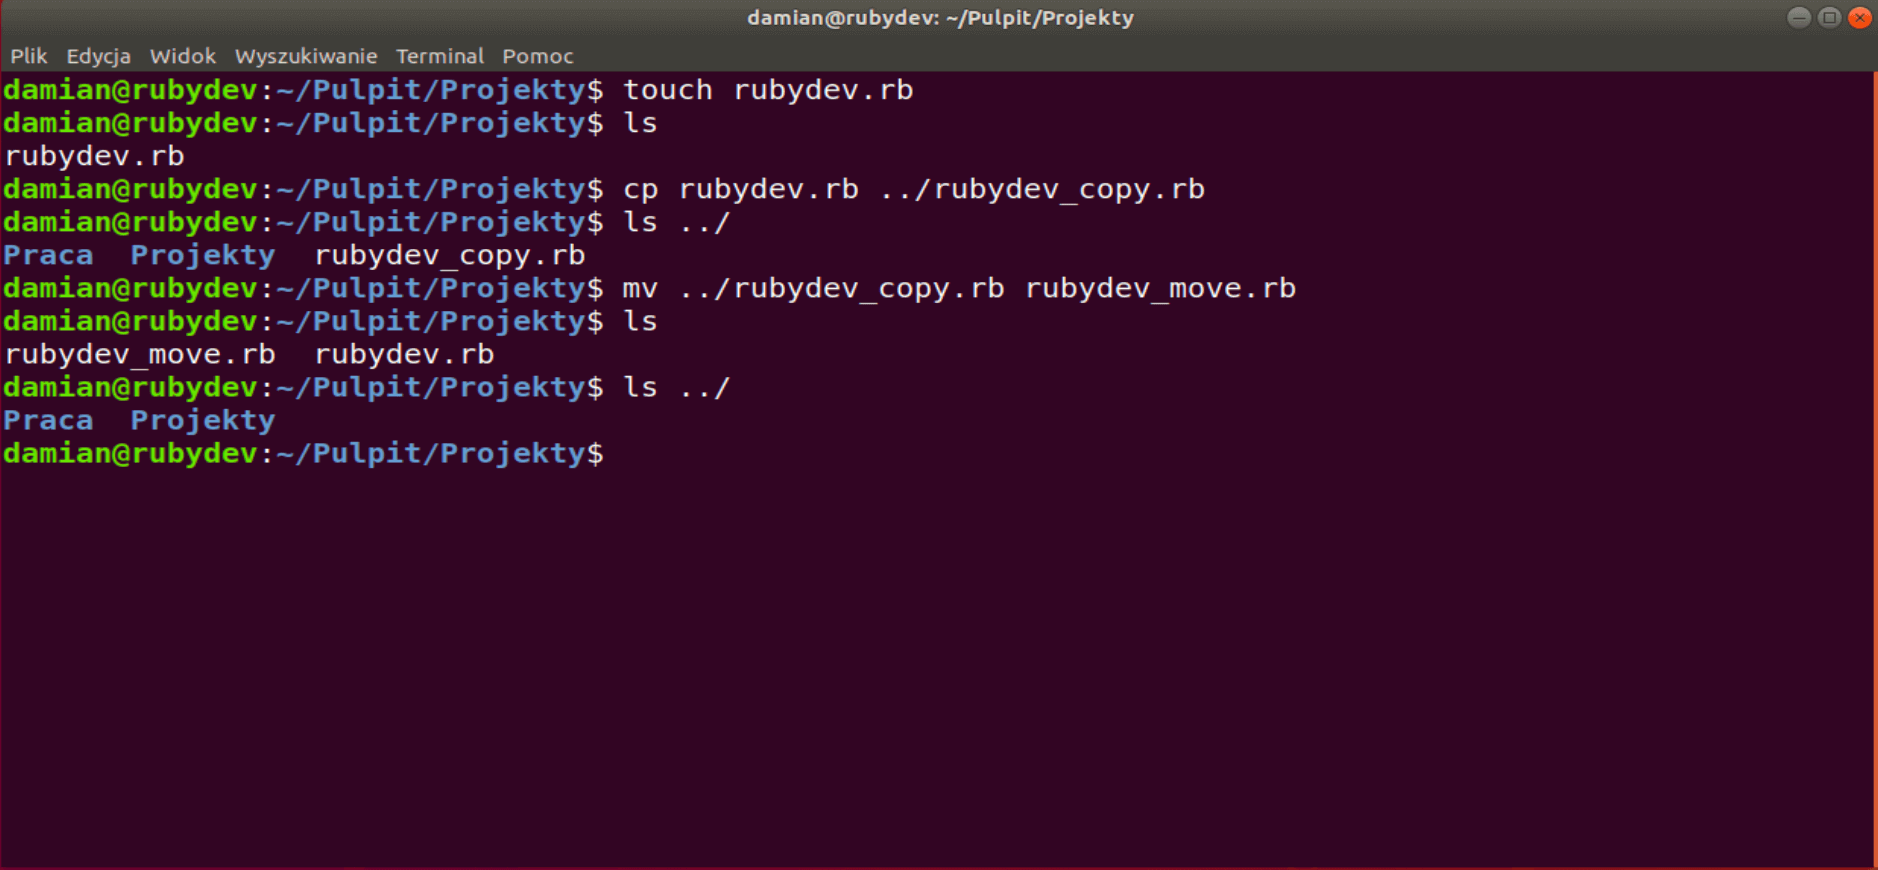
You can also transfer files. Let’s try to move the previously copied file back to the directory in which you are located, changing its name at the same time.
We move the rubydev_copy.rb file from the parent directory to the directory in which we are currently located
To move files and directories, use the mv (move) command, which – just like cp – takes two input pieces of information: what and where to move.
Unnecessary? Let’s delete!
As it usually happens, after some time, you will have files and directories that you no longer need or use. There are also appropriate commands to delete such files and directories.
rmdir (remove directory) – removes the empty directory that you give as a parameter. If you give more paths to directories, it will delete them all.
rm (remove) – removes the file. To delete a directory with this command, we you the -r -f option. This command accepts one parameter only, namely the path to the file or directory. If you want to delete all files in the directory in which you are located, you can pass the * character as a parameter. The command will then look like this: rm *
 damian@rubydev:~/Pulpit/Projekty$ ls rubydev_move.rb rubydev.rb
 damian@rubydev:~/Pulpit/Projekty$ rm *
 damian@rubydev:~/Pulpit/Projekty$ ls
 damian@rubydev:~/Pulpit/Projekty$
Before using *, make sure (with pwd) that you are in the right place so as not to delete important files.
The previously mentioned options -r (recursive, delete files in subdirectories) and -f (force, delete without confirmation, including files protected against deletion) are used together to remove a directory with all its content. Therefore, before using rm -rf, you need to be sure what you are removing.
Tasks:
1. Using man, read the documentation for the commands discussed above,
2. Create two directories: project_1, project_2
3. Create three files in the project_1 directory (any names), e.g. application.rb, routes.rb, puma.rb
4. Copy all files from project_1 to project_2, and then delete project_1.
Summary
As you can see, handling the terminal is not difficult, it just takes a little practice. To really master it, I recommend using the terminal for all simple operations. In the second part of this tutorial, I will show you some other commands that are worth knowing. Bye!